Sunday, August 5, 2012

super easy DIY kids shoe storage

My son has this problem. Too many toys. My son has been blessed with toys since he was little, but he doesn't like to part with any of them. So we are always left with finding places to put his toys so the house doesn't look as cluttered. In an effort to utilize his closet for toy storage I had to figure out a way to get his shoes off the floor. I would use an over the door shoe holder, but some of those do not hang low enough for him to reach. Plus I would rather use something we already have to save money. 
So this is what I came up with. 


I took some unused baskets and hung them up on the inside of his closet. By hanging them on the side he can use the inside of the basket as well as the top. Make sure the nails you use are heavy enough to hold the shoes!

Super easy, cost me nothing and the baskets are low enough so my toddler can pick out his shoes. And it may not seem like just by getting rid of shoes on the floor it would clear up space but, boy oh boy it really did!

And if you want to really jazz up the baskets line the back with scrapbook paper. 


~ Miranda

Sunday, July 8, 2012

Nap Time Library Bag Tutorial- Guest post

The following post was submitted by Shannon with Sweet Panda Boutique.


Hello readers! My name is Shannon, WAHM behind Sweet Panda Boutique (Sweet Panda Boutique ). I'm delighted to be guest blogging for my new friends, Miranda and Kelsey.

My daughter and I went to story time at the local library last week, and saw some kiddos with super cute library totes! What a great idea. Totes give preschoolers ownership over their responsibility to take care of and return their borrowed books. When the books live in the tote, it's easy to keep them separate from a home library as well. Of course, it's also an excuse to use some cute fabric, or up-cycle an item that isn't getting much love. This tote came from curtains that no longer match my daughters décor.

I named this tote “Nap Time Library Bag”, because it can be reasonably sewn in under an hour (unless you rip a lot of seams like I do during experiments). A beginning sewer can make this bag, so give it a shot! Bear with me, it's my first tutorial and original design.


The Nap Time Library Bag

Supplies:
  • 1/3 yard of an inner fabric (woven cottons work nicely)
  • 1/3 yard of an outer fabric
  • Coordinating thread
  • Double Fold Bias tape for outer pocket (optional) Length = 1 width of your chosen bag size.
  • Fusible interfacing (1/3 yard, optional) (I used interfacing to make the bag a bit more stiff, but your bag will work fine without it. My bag has a front pocket, and you can choose to omit or include that as well.)
Step 1: Wash, dry, and iron your fabric. This is always good to do, as finished items wont shrink when washed, and you'll get rid of the nasty chemicals from fabric production.

Step 2: Cut your fabric. You may choose sizing based upon your needs. I wanted my toddler to be able to handle the bag, so it is small. You can modify and make the straps longer if you choose as well.


Cut 2 for outer, 10 x 12

2 for inner, 10 x 12

2 strips for straps, 3 x 12
Cut 2 pieces of interfacing, 9.5 x 11.5
If including the pocket:
1 length Bias tape, 10 inches
1 pocket outer piece, 10 x 7
1 pocket inner piece, 10 x 7
Fuse the interfacing to the outer fabric pieces per manufacturers instructions. Leaving 1/4” of fabric on each edge


Step 3: Sew the straps. Fold the strips lengthwise and iron. Using a 1/4” seam allowance, sew up the raw edge, end to end. Don't forget to backstitch when you start and stop. Turn inside out, and iron again. Now topstitch 1/4” from both sides, creating a finished strap. Repeat for 2nd strap and set aside.


Step 4: Prepare the pocket (if you aren't using a pocket, go to step 5). Place your inner and outer pocket pieces together, right sides out. Choose a 10” edge and slide bias tape over it. If you look at the tap, on side will be slightly shorter than the other. Put the shorter side in front, where you'll be stitching. Pin in place. Straight stitch near the fold on the bias tape, catching the other side as you stitch. This finishes the top seam of your pocket.

Step 5: Sew your outer shell. If using a pocket, pin the pocket piece to the bottom of your front fabric piece. Make sure the pocket raw edges line up with the outer raw edges. Your finished edge will cross the center of the piece. Pin the back outer piece to the front piece, right sides together. Start sewing from the top left corner to the bottom left corner, using a 1/4” seam allowance. Put your needle down 1/4” from the end, lift the presser foot and turn fabric 90 degrees. Continue sewing across the bottom, turn at corner, and finish at the top right corner. Be sure to leave the top open. Clip the bottom corners. Finish with zig zag stitch or serger.

Step 6: Repeat step 5 for the inner lining pieces.


Step 7: Using 1/8” seam allowance, stitch the straps to the inner lining. Take one strap piece, pin one edge 1.5” from the seam, and the the other edge of the same strap 1.5” from the opposite seam. Be sure the strap is not twisted, and the raw edges from the strap and inner piece match up. Do the same for the 2nd strap on the 2nd lining piece.


Step 8: Sew the inner and outer bags together! Turn the lining bag right side out and the outer bag wrong side out. Place the inner bag inside of the out bag. Right sides will match up. Pin at the side seams to ensure they match. You will need to leave a 2-3” hole to turn the bag when finished. Start sewing with a 1/4” seam allowance at the inside edge of 1 back strap. Continue all the way around the top of the bag until the inside edge of the other back strap. Back stitch. This will leave and open seam at the center back.

Step 9: Turn bag and iron. Using the open edge, pull the bag through until your fabric is right side out. Your project now resembles a bag! Line up the top seams and iron around the opening for easy top stitching. At the opening, turn the raw edges in and iron so they mimic the sewn seams.

Step 10: Top stitch. I like to start at the beginning of the open seam to get that out of the way. Sew across that seam with a 1/8” seam allowance and continue all the way around the top of the bag. Back stitch at beginning and end.

You now have an adorable tote for your kiddo to carry his/her library books in!

Sunday, July 1, 2012

Firecracker crayons! Easy kid craft to celebrate the 4th of July!


This is a super easy, fun and frugal way for your kids to celebrate the 4th of July. Chances are you already have everything on hand to make these little firecracker crayon cuties!


You will want to start by peeling the paper off some crayons breaking them up and putting them in a microwave safe bowl. This is where the kids can help. My little guy had a blast peeling the crayons and even more fun breaking up the crayons. With each little snap he giggled and said "YAY!". 

*fact- snacking while crafting makes it even more fun!*

Save the paper from the crayons! You never know when you may need them or find a fun craft or project you can use them for!

After peeling and breaking up all the crayons put the bowl into the microwave. Microwave for 1 minute or 1 1/2 minutes and stir (I used a wooden skewer). Continue this process until the crayons have melted. Please don't forget to use an oven mit while handling the bowl. The melted crayons are hot and the bowl is too. It's best that the parents be in charge of this process while the kids watch.

Here is a chance to get creative. While the crayons were melting I used a knife and shaved some red, white and blue crayons into the mold to add extra spark since these are firecracker crayons. 

After the crayons have melted, and while using an oven mit- pour the mix into your mold. And don't worry if some of the mix pour over like this...
Just quickly use another stirrer to scrape away the overflow before it hardens.

Now you wait for the crayons to harden. This amount of time depends on the size of the molds. You can always put them in the freezer to speed up the process. It took ours a couple of hours. How you want to spend that time is totally up to you, but...

Once the crayons are hardened pop them out of the mold. Your kids can help with this, as long as you are sure they are completely cooled!

End result-


These would also be a fun idea as home made gifts. With the large variety of molds these days your possibilities are endless! 

HAPPY 4TH OF JULY!

~ Miranda


Sunday, June 24, 2012

Snow in the Summer- super easy kid fun!


My little guy has been having a hard time recovering from a surgery he had recently, and unfortunately has not been allowed to be outside and run around and enjoy the summer. So we've been left to find ways to occupy our time and hold his interest when the toys are fun anymore and we've watched all our movies at least 3 times. Time to get creative!
We came up with snow in the summer- and it's so simple and easy. You probably already have everything you need in the house. 
My son received some 'shaving cream' as a Christmas present and has never used it. So we busted that out and sprayed it all over the back of a large poster board we didn't need anymore. We smushed the the 'snow' all around, made snowmen and pulled out some cookie cutters to use in it as well. 


Then we splattered some finger paint into the 'snow' and used a straw to swirl all the colors around.

*i love this goldfish crumb face kid!*

This was a simple, easy but fun project for my little guy. I hope you enjoy it too!

~ Miranda


Friday, June 22, 2012

Water Play Tray

My poor little girl is sick! We usually just mope around and watch movies when we're down with the yucks but I can see that she wants something more today and I don't blame her. So here's what we came up with:


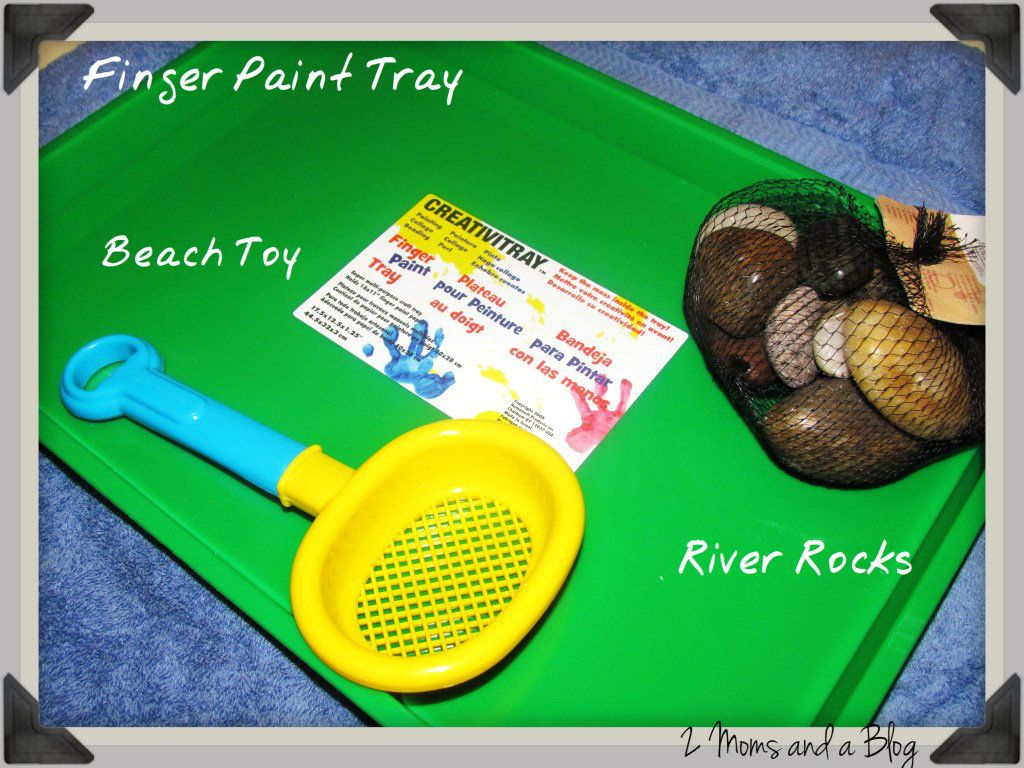
All we needed for this project was a finger painting tray, sand sifter beach toy and some large river rocks (much too large to swallow). All of these things I got at Michaels for $9 and it could be cheaper if you have one of their awesome coupons.

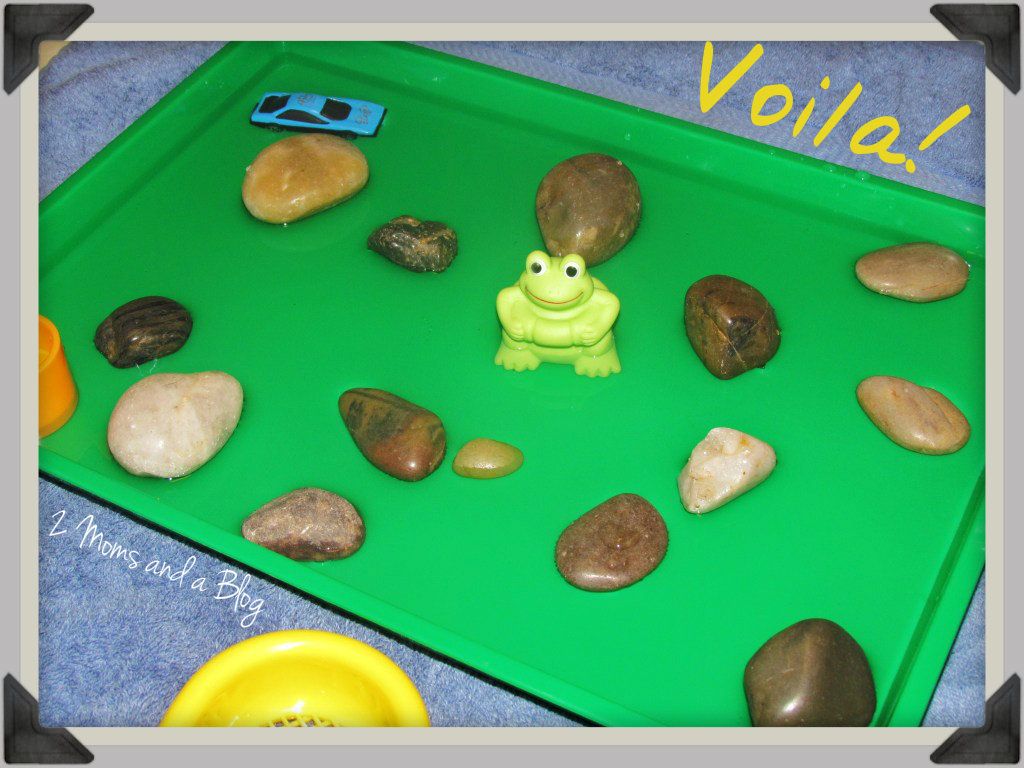
I laid the river rocks out in the bottom of the tray, poured a couple inches of water on top and threw in some different small toys as well for different textures that would interest her. That's it! Just let them splash and discover and switch out the toys often for new discoveries. The best thing about this is that each purchase can be easily used for something else:

-The finger painting tray is obvious, just use it for what it was intended!

-The beach toy can be used on vacation or at the park or even in the bathtub

- & if she gets tired of the river rocks, just use them for decoration!


Happy Crafting!

-Kelsey


Friday, June 15, 2012

Chocolate Cherry Almond Cookies


This cookie is beloved by my Hubby. 

Warning: Do not leave out overnight, there will only be crumbs in the morning!


2 cups of all-purpose flour
1/2 cup unsweetened cocoa
1 teaspoon baking powder
1/4 teaspoon salt
8 ounces unsalted butter, softened
1 cup of light brown sugar
2/3 cup granulated sugar
2 large eggs
1 teaspoon almond extract
1 cup semi-sweet chocolate chips
1 1/2 cup dried cherries


Sift flour, cocoa, baking powder and salt into a medium mixing bowl, set aside. Cream unsalted softened butter, light brown sugar and granulated sugar in a large mixing bowl until fluffy. Mix in one egg at a time into butter mix then add almond extract. Add flour mixture into butter mixture a little at a time on low speed until completely absorbed and is a cookie dough consistency. Fold in chocolate chips and dried cherries. 

Set oven to 350 degrees. Drop tablespoon size drops onto a greased cookie sheet or wax paper. Bake  for 10-15 minutes. YUM!

Enjoy!
-Kelsey

Last minute Father's Day Gift Ideas- great for Grandpa too!

With Father's Day only 2 days away, you may be rushing and stressing to find the perfect gift for your little one to present to their Dad and even Grandfather. Times are tough, so that boat they have been eyeing is out of the question. Why not go the keepsake route?
I made this for my husband from our son, and plan to have it printed and framed. Which I can have done at Walmart all for under $10.00. Great deal! It's going to be something I make for him every Father's Day going forward. 


I used Photobucket.com to add the text and edit the picture. Something like this would also be a nice touch for a birthday party on the food or gift table. 

So relax this Father's Day, enjoy the Dads in your life and reward them with something they can keep for years to come!

~Miranda